Check out the Pintrest board for this episode here!
OMG! Sharon is back! The two weeks she was gone seemed life FOREVER to us!!! It also seems like we have been trying to get this episode done forever. The Gals lost it the first three times due to a computer issue that Katie has been having (luckily, we think we found a way to avoid that issue until her computer be replaced… for now). So yeah, this is a great effing day! Sharon is back, paper quilling is happening… we are all smiles around here. How about you?
So to get us started off we thought you all might like a little information on the history of quilling… if this is true then you are lucky, because there is VERY LITTLE information available regarding the origins of paper quilling. The Blog Quilling World provides a pretty good resources page on the history of this cool art form and some amazing pictures! This is where you will see the furniture that Sharon and Katie talk about in this episode. http://quillingwonderland.com/history-of-quilling/quilling-history/
Quilling requires very few tools, and you can actually do it without tools if your fingers are awesomely nimble like that. Since our are defiantly not, we use the tools… the kit that Katie bought contains slotted tool, a needle tool, some bass ass needle point tweezers, a sizing ruler (which she has yet to use) and some strips of quilling paper. When Katie mentioned this kit in the show she recalled it being about half this price but remember later that it was so cheap because she cashed in her Amazon Rewards to get it. This is still a good price and it is Prime eligible. Check out your local art supply stores to see if you can find any of these tools there and let us know if you do (we have had no luck finding them in our local stores). http://www.amazon.com/Quilled-Creations-Beginner-Quilling-Kit/dp/B000Y8Z9RC/ref=pd_sim_ac_20?ie=UTF8&refRID=1M9HMSE7E6EQX4EHC7QP
Oh! And since the photos Katie took were just to document the process and were not necessarily intended to be used in a tutorial, there aren’t actually any images of the tools being used so here is a quick video that shows how to use the slotted tool and make some basic shapes.
Oh! And before that tutorial gets under way here is a link to the Etsy shop of Alia Design where you can see the amazing “geek” paper quilling that absolutely flipped Katie and Sharon out! This is some amazing stuff so prepare to have your mind blown! https://www.etsy.com/shop/AliaDesign?source=aw&utm_source=affiliate_window&utm_medium=affiliate&utm_campaign=us_location_buyer&utm_content=78888
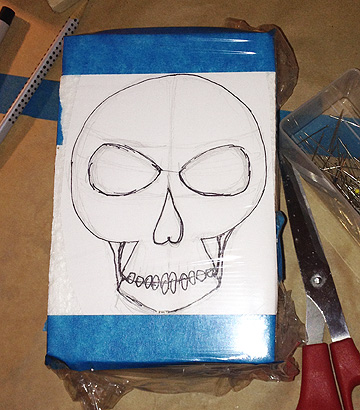
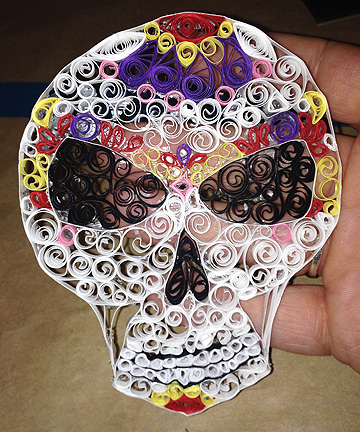
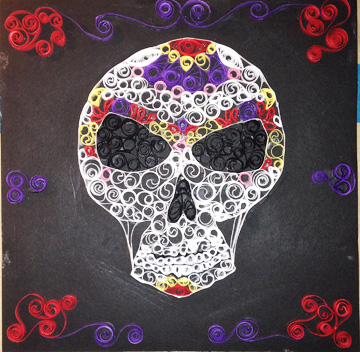
OK, on to the tutorial! Unfortunately Katie didn’t take a finished picture of the quilled monogram that she made for her niece but as Sharon mentioned, monograms are a pretty common use for paper quilling and you can find hundreds of images with a quick Google search. This tutorial is a sort of step by step of how Katie out together the quilled sugar skull she did recently.
Step 1. Begin with a simple line drawing or printout of the image you would like to quill. Tape this to a piece of cardboard or styrofoam block so that your straight pins will have something to poke into. Cover the image with plastic wrap so that your quilling will not get stuck to the paper you did your sketch on.
Step 2. It is helpful to put a small dab of glue on the upper corner of your working area as you will be doing a lot of gluing. Begin by establishing your outline. You will most likely need to glue two or more strips together to obtain the proper length. Pin the strip in place, on its edge, along the drawing outline. At this point the only thing you will have glued are the ends of the outline when uniting them to complete the solid outline.

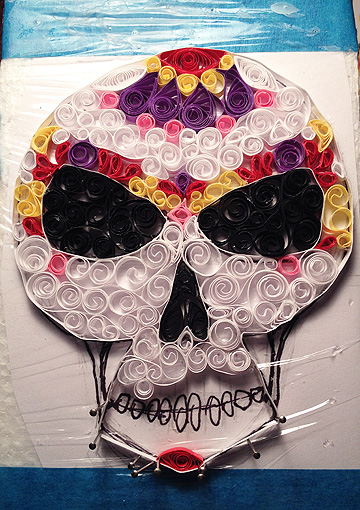
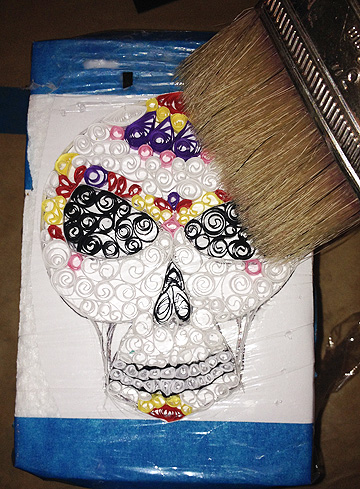
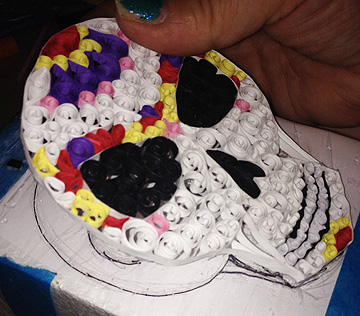
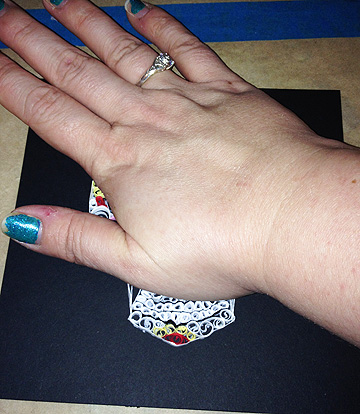
Step 3. Now you will strategically fill the outline to create the image you desire. You will do so my creating basic swirls, waves, and other shapes and then placing them inside the outline. You will always apply a small amount of glue to the sides of your shapes so that they are affixed to the shape on either side. Hold the shapes in place with straight pins until dry. You may want to break the image up into sections so that you can remove some pins before going on to the next section. Here you can see the pins holding the quilled shapes together as I begin to fill the sugar skull in the first image. The second image is dry, with the pins removed before beginning to fill another area.

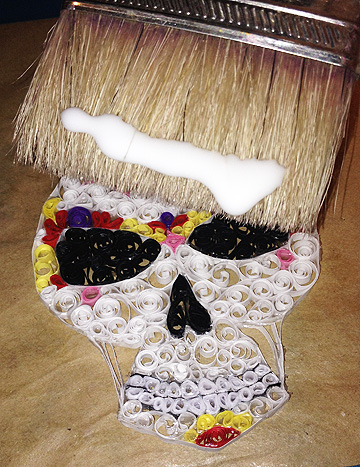
Step 4. Once your image is completely filled and dried you may want to give it a quick and gentle brush off in order to remove stray glue bits or lint.
Step 5. Gently lift the quilled image off the plastic. It should come up easily but you may need slide a ruler underneath a couple of stubborn areas. If you are as enthusiastic about your glue use as I am, you may have some dried glue on the underside of your quilled image. Don’t worry about it as that is the side you will glue down… just give it a light brush off like you did the front.
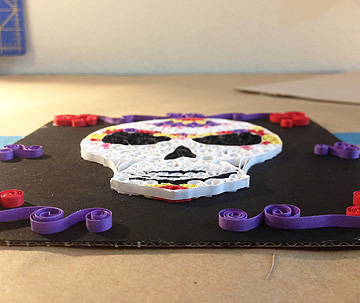
Step 6. Brush glue on the back side of your quilled image and place it on the surface you will be displaying it on pressing gently. You will want to put a little weight on it as it dries to ensure full contact; a smallish book should do the trick (just ensure that it is big enough to cover the image you are gluing down).
Step 7. Once it has dried you can add some embellishments around the image as I chose to do, or you can just leave it as is and display it proudly in all its awesome glory. Paper quilling is most often displayed in a shadowbox style frame but you should feel free to experiment and use/display this art in any way your artsy mind comes up with.

As Katie mentioned, this is only her second quilling project and she had a couple of fails when getting started on each. So if you “mess up” just take a deep breath and move on! If you would like to see some really awe inspiring Chinese style quilling check out the book Paper Quilling Chinese Style, published by Zhu Liqun Paper Arts Museum. http://www.powells.com/biblio?isbn=978-1-60220-017-3
As always, The Gals look forward to seeing your arts and crafts and hearing about your successes and fails. If you want to share about your experiences paper quilling, or if you have questions/comments about the show, please email us at twoartsygals@gmail.com. Next week Sharon and Katie are going to be back to talk to you about yarn; yes! Gloriously delicious yarn! You know they are going to get excitable about this topic so make sure you are subscribed to the podcast through iTunes or Stitcher, or by clicking on the RSS symbol on this blog… and until next week, make some cool shit, yo!